Obtaining Impressions
Modified Geneva Protocol Modified Geneva Protocol

Initial impressions workflow
- Rinse the mouth with alcohol-based wash.
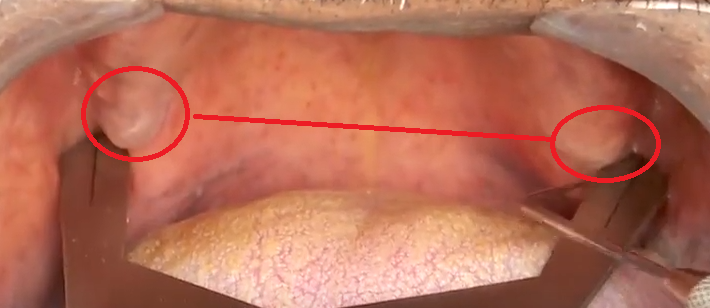
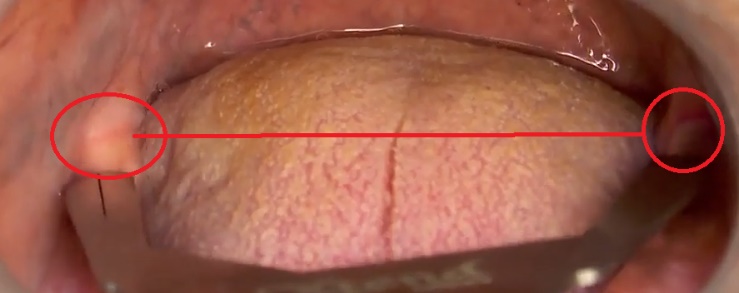
- Find the correct tray with good extensions in the back.
- (¼ inch space between the arch and the flange and the soft tissue borders)
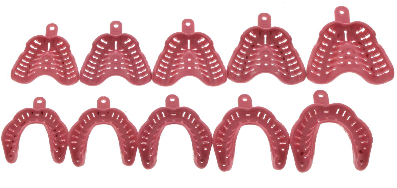
- Edentulous tray- round floor, short flange, L shaped handle.
- The standard size is #2 (large) for the upper teeth, and #4 (medium) for the lower teeth, but while this is the correct size for most people, some may need a different size for the upper, lower, or both.
- Joe Massad edentulous trays- 5 sets of upper and lower arches
Place the low temperature Massad tray in the water at 165-degree F (74C) for 30 secs.
Let it cool enough to be placed in the mouth.
Place in the mouth and ask the patient to suck the fingers and smile movements to make somewhat a
Custom tray.

Maxillary Tray-
Measure the Maxillary ridge distance between the hamular notches
Using the measurement pick the right size tray.
Mandibular Tray-
Measure the distance between the retromolar pads.
Using the measurements-pick the right size tray

Maxillary impression: 12-14 mins
1.Place tissue stoppers
In four places-2 near molar regions, one in the center and the other near.
The incisors-Place in the patient mouth and set it for 2 minutes.
Place adhesive- Make sure it is dry before proceeding to the next step.
2.Border molding-

Working time- 1min and 30 secs
Set In time----- 3min and 30 secs
- Place the tray at 90 degrees, once in the mouth rotate. Retract the cheek to enter the mouth.
- Posterior first and then anterior. Exert minimal pressure.
Functional movements as below.
- Anterior Frenum-grasp the philtrum and gently squeeze and pull done- gently pull the upper lip.
- Laterally and downwards.
- Anterior vestibular sulcus-Sucking action of the lips.
- Buccal frenum and buccal vestibular sulcus.
- Post Zygomatic vestibular sulcus- Ask the patient to move the jaw downwards.
- Hamular frenum.
- Post palatal zone- Valsalva maneuver.

3.Wash impressions- Rationale
2.Border molding


Obtain static impressions of loadbearing areas
Place light body on the base of the denture- yellow tip
Working time-2 min 15 secs
Set in time- 3 min 30 secs
- Place in the mouth.
- Repeat the functional movements.
- Anterior Frenum-grasp the philtrum and gently squeeze and pull done- gently pull the upper lip.
- Laterally and downwards.
- Anterior vestibular sulcus-Sucking action of the lips.
- Buccal frenum and buccal vestibular sulcus.
- Post Zygomatic vestibular sulcus- Ask the patient to move the jaw downwards.
- Hamular frenum.
- Post palatal zone- Valsalva maneuver.
Mandibular Impressions: 12-14 minutes
Place adhesive- Make sure it is dry before proceeding to the next step.
1.Place tissue stops
Two near the molars and one near the incisors. Let it set for 2 minutes.
Place adhesive-
2.Border molding

- Place heavy body PVS on the periphery of the border.
- Place the tray at 90 degrees, once in the mouth rotate.
- Posterior first and then Anterior.
- Functional movements.
- Sucking action, wide smile, move the tongue in, out and rotate.
- Remove after it sets in.
- Remove ½ mm of the thickness of the border to let the wash material to flow in.
- Place adhesive-
3.Wash impressions

Rationale-Obtain static impressions of loadbearing areas
- Place light body PVS in the base.
- Place the tray at 90 degrees, once in the mouth rotate.
- Posterior first and then anterior.
- Functional movements.
- Sucking action, wide smile, move the tongue in, out and rotate.

Courtesy of Joe Massad videos and ROE lab